 Current
location:
Current
location:1. Introduction
1. Document Version: V1.0
2. White Paper Compilation Unit: Shandong Hengmei Electronic Technology Co., Ltd.
3. Compilation Date: November 21, 2025
4. Core Positioning: This white paper presents the complete product information of Hengmei Intelligent Manufacturing's Portable Raman Spectrometer (Model HM - SLM). It covers product basic information, core technologies, technical parameters, application scenarios, and operation guidelines. It is designed to provide accurate data support for product promotion, user selection, on - site detection, and quality control in fields such as public security, food safety, and pharmaceuticals, helping users quickly master the instrument's functions and application methods.
2. Table of Contents
1. Introduction
2. Table of Contents
3. Product Basic Information
4. Core Technologies and Functional Features
5. Detailed Technical Parameters
6. Application Scenarios and Industry Adaptation
7. Accessories and Consumables Configuration
8. Instrument Installation Steps
9. Instrument Use and Operation Steps
10. Sample Detection Steps
3. Product Basic Information
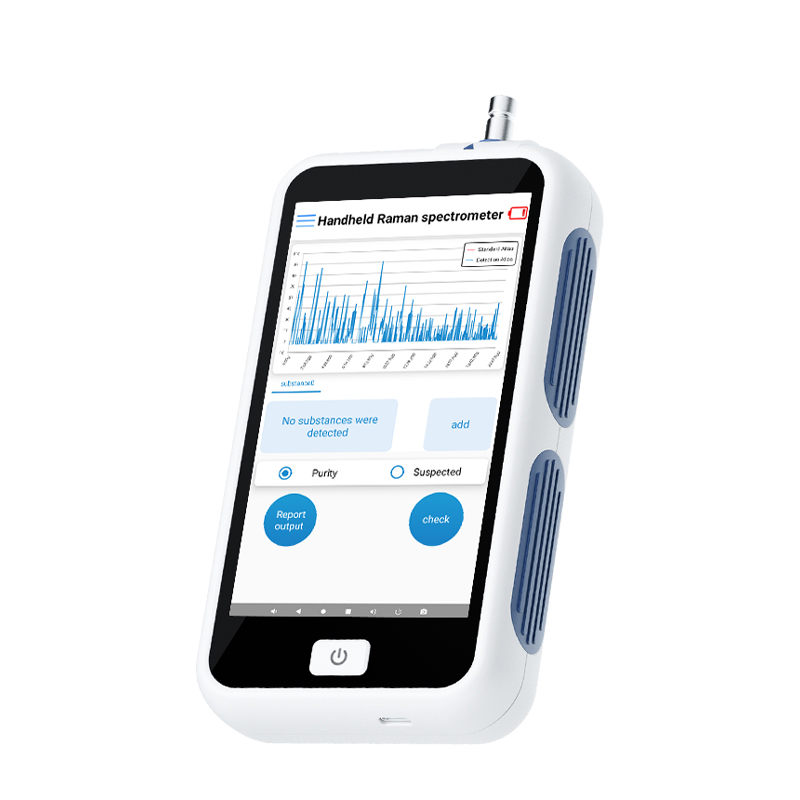
1. Product Name: Hengmei Intelligent Manufacturing Portable Raman Spectrometer
2. Model and Market Positioning: The model is HM - SLM. It is a portable miniature confocal Raman spectroscopy detection device based on the Raman scattering principle. By using a laser to excite the vibrational/rotational energy level transitions of sample molecules, it acquires characteristic spectral information and quickly identifies the composition of substances. It is positioned as a fast, non - destructive, and high - sensitivity on - site detection tool for industries such as public security drug detection, food safety, pharmaceutical raw and auxiliary material identification, jewelry testing, and industrial material analysis, meeting the needs of rapid on - site substance analysis.
3. Product Appearance and Structure: The main unit of the instrument has dimensions of 195×99×35 mm and weighs 750 grams (including the battery), making it lightweight and easy to carry. The front panel is equipped with a 5.5 - inch high - definition touchscreen for operation and result display, enabling intuitive interaction. The instrument integrates a 13 - megapixel camera for on - site photo shooting and a GPS positioning module for recording detection location information. The side panel is provided with a Type - C interface (for charging and data transmission), and supports Bluetooth, WiFi, and optional 4G communication functions. The top of the instrument is the detection probe area, which can be equipped with auxiliary detection heads for solid, powder, and liquid samples. The instrument has an IP67 dust and water resistance rating, suitable for use in complex environments such as outdoors and workshops.
4. Core Technologies and Functional Features
1. High - Performance Raman Scattering Detection Technology: The instrument adopts a 785±0.5nm laser (with a line width < 0.08nm) as the excitation source, combined with a miniature confocal optical design. This design effectively suppresses background noise and reduces the interference of high - fluorescence samples, ensuring a spectral resolution of 5cm⁻¹ and a spectral range of 200 - 3800cm⁻¹ (790 - 1100nm). It can accurately capture the characteristic spectral peaks of substances, realizing high - sensitivity detection of trace components.
2. Cloud - Based Data Management Technology: The instrument is equipped with a cloud service system. Detection data can be uploaded wirelessly to the cloud platform for long - term storage, dynamic analysis, and management. Users can update the instrument's data model and spectral library through the cloud, and perform remote spectral retrieval and identification. The cloud platform also supports private deployment, providing users with customized database services to meet the special detection needs of different industries.
3. Intelligent Interactive Operation Technology: The 5.5 - inch high - definition touchscreen simplifies the operation process, and the one - click operation realizes spectral collection within 3 seconds (with a routine integration time of 500ms). The instrument integrates a GPS positioning module and a 13 - megapixel camera, which can record the detection location and on - site photos while obtaining spectral data, and generate PDF format test reports for export. It supports user - built spectral libraries and audit trail functions, facilitating traceability and management of detection processes and results.
4. Non - Destructive and Convenient Detection Technology: The instrument does not require direct contact with samples and can detect through transparent and semi - transparent containers such as glass, plastic bags, and beverage bottles, avoiding sample pollution and damage. It supports the analysis of suspected substances and has a built - in standard spectral library covering chemical drugs, explosives and their precursors, precursor chemicals, toxic and harmful substances, anesthetics, chemical reagents, pesticides, and uncommon chemicals, meeting the diverse detection needs of different industries.
5. Flexible Power Supply and Environmental Adaptation Technology: The instrument is powered by a 7.4V/3.5AH rechargeable lithium battery, providing a battery life of 4 - 6 hours to meet the needs of long - term on - site detection. It adopts an IP67 dust and water resistance design and can work normally in an environment with a temperature range of 0 - 50℃ and a relative humidity of 5% - 80%, adapting to complex working conditions such as laboratories, outdoors, and workshops.
5. Detailed Technical Parameters
1. Spectral Performance:
◦ Spectral Range: 200 - 3800cm⁻¹ (corresponding wavelength range 790 - 1100nm)
◦ Spectral Resolution: 5cm⁻¹ (realized by miniature confocal design)
◦ Excitation Wavelength: 785±0.5nm, with a line width < 0.08nm
◦ Laser Power: 0 - 500mW, software - adjustable; complies with GB7247.1 - 2012 "Safety Requirements for Laser Products"
◦ Integration Time: 1ms - 10s, software - adjustable; routine detection only takes 500ms
1. Hardware Configuration:
◦ Display Screen: 5.5 - inch high - definition touchscreen
◦ Camera: 13 - megapixel
◦ Positioning Module: Integrated GPS
◦ Protection Level: IP67 (dust and water resistance)
◦ Storage Capacity: 2 + 16G, optional 8 + 32G
◦ Operating System: Android 12
1. Power Supply and Battery:
◦ Power Adapter: 5V/2A
◦ Battery: 7.4V/3.5AH rechargeable lithium battery
◦ Battery Life: 4 - 6 hours of continuous use
1. Communication Interfaces:
◦ Wired Interface: Type - C (supports charging and data transmission)
◦ Wireless Interfaces: Bluetooth, WiFi; optional 4G
1. Physical Dimensions and Weight:
◦ Main Unit Dimensions (Length×Width×Height): 195×99×35mm
◦ Main Unit Weight (including battery): 750 grams
1. Working Environment:
◦ Operating Temperature: 0 - 50℃
◦ Operating Humidity: 5% - 80% relative humidity
6. Application Scenarios and Industry Adaptation
1. Public Security Industry: Used for on - site detection of drugs, explosives, and precursor chemicals. It can quickly identify the type of suspicious substances at the scene of public security incidents, such as drug trafficking, explosion - related cases, and ensure the safety of law enforcement personnel and accelerate the progress of case handling.
2. Food Safety Industry: Applied to the detection of harmful substances in food, such as pesticides and veterinary drug residues in fruits and vegetables, illegal additives in dairy products and meat products, and quality identification of edible oils. It helps food supervision departments conduct on - site random inspections and food production enterprises implement quality control.
3. Pharmaceutical Industry: Used for the identification of pharmaceutical raw materials and auxiliary materials, such as the authenticity and purity detection of APIs, excipients, and packaging materials. It can also monitor the uniformity of drug components in the production process, ensuring that pharmaceutical products meet pharmacopoeia standards and ensuring drug safety and effectiveness.
4. Jewelry Testing Industry: Suitable for the identification of jewelry materials, such as distinguishing real and fake diamonds, detecting the composition of precious metals (gold, silver, platinum), and identifying the type of gemstones (rubies, sapphires, emeralds). It provides accurate testing data for jewelry appraisal institutions and jewelry sales enterprises.
5. Industrial Material Analysis Industry: Applied to the quality testing of industrial materials, such as the composition analysis of plastic products, rubber materials, coatings, and fibers. It helps industrial enterprises control the quality of raw materials and finished products, optimize the production process, and improve product performance and reliability.
6. Environmental Protection Industry: Used for the detection of toxic and harmful substances in the environment, such as the analysis of pollutants in water bodies, soil, and air. It provides technical support for environmental monitoring departments to conduct on - site investigations and emergency disposal of environmental pollution incidents.
7. Accessories and Consumables Configuration
1. Standard Accessories:
◦ 1 HM - SLM portable Raman spectrometer main unit
◦ 1 solid/powder sample auxiliary detection head
◦ 1 liquid sample auxiliary detection cell
◦ 1 liquid - assisted detection pool (for liquid sample detection)
◦ 1 power adapter (5V/2A)
◦ 1 Type - C data cable
◦ 10 2ml liquid chromatography injection vials (sample bottles)
◦ 1 user manual
◦ 1 watch repair card (warranty certificate)
1. Consumables:
◦ Cleaning wipes (for cleaning the instrument surface and detection probe)
◦ Replacement sample bottles (2ml liquid chromatography injection vials)
◦ Protective glasses (to protect operators' eyes from laser radiation)
◦ Replacement lithium batteries (matched with the instrument model)
8. Instrument Installation Steps
1. Unpacking and Inspection: Open the instrument packaging box and check whether all standard accessories (main unit, auxiliary detection heads, power adapter, data cable, sample bottles, etc.) are complete and intact according to the packing list. Confirm that the instrument main unit has no scratches or damage, and the touchscreen is free of cracks. If any missing or damaged parts are found, contact the manufacturer or local agent in a timely manner.
2. Battery Installation (if not pre - installed): If the battery of the instrument is not pre - installed, open the battery compartment cover on the back of the main unit, insert the 7.4V/3.5AH lithium battery into the battery compartment in the correct direction (align the positive and negative poles), and then close the battery compartment cover and fasten it.
3. Charging Preparation: Connect one end of the power adapter to a 220V AC power socket and the other end to the Type - C charging interface of the instrument. The charging indicator light on the instrument will turn red, indicating that the instrument is being charged. When the charging indicator light turns green, the battery is fully charged (the charging time is about 4 hours).
4. Auxiliary Detection Head Installation: According to the type of sample to be detected, select the corresponding auxiliary detection head. For solid or powder samples, install the solid/powder sample auxiliary detection head on the detection probe of the main unit; for liquid samples, install the liquid sample auxiliary detection cell on the detection probe. Ensure that the auxiliary detection head is installed firmly and there is no looseness.
5. Power - On Check: Press and hold the power button of the instrument for 3 seconds to turn on the instrument. The instrument will automatically start the Android 12 operating system and enter the login interface. Check whether the touchscreen responds normally, and whether the camera, GPS, and communication functions (Bluetooth, WiFi) work properly. If any abnormalities are found (such as no display, unresponsive touch), turn off the power immediately and check the battery installation or power connection.
9. Instrument Use and Operation Steps
9.1 Pre - Operation Preparation
1. Power - On and Login: Press and hold the power button for 3 seconds to turn on the instrument. On the login interface, enter the default username "admin" and default password "12345678" (the password can be modified later, with a length of 6 - 20 characters, including numbers, letters, and special characters). After successful login, the instrument enters the main operation interface.
2. Network Connection: If cloud detection or data upload is required, connect the instrument to a wireless network. Swipe up from the bottom of the touchscreen to open the notification panel, click and hold the WiFi icon to enter the WiFi settings page, select the target WiFi network from the network list, enter the WiFi password, and click "Connect" to complete the network connection.
3. Parameter Setting (default parameters are recommended, and this step can be skipped if no special requirements): Click the "Settings" icon on the main interface to enter the parameter setting interface. You can set parameters such as spectral display mode (pixel, wavelength, or displacement), integration time, laser intensity (generally set to 80 for routine detection), spectral recognition threshold (the default value of 0.92 is recommended), and upload address. After setting, click "Save" to apply the parameters.
9.2 Spectral Collection and Retrieval
1. Sample Placement: Place the sample in the correct position according to the sample type. For solid samples, press the narrow end of the solid/powder auxiliary detection head against the surface of the sample; for powder samples, put an appropriate amount of powder (≥0.5mL) into a sample bottle and make the detection probe touch the top of the powder pile; for liquid samples, pour the liquid into a sample bottle, install the liquid sample auxiliary detection cell on the probe, and make the probe align with the liquid in the sample bottle.
2. Spectral Collection: On the main interface, click the "Collect" button to start spectral collection. The instrument will automatically emit laser to excite the sample and collect the Raman spectrum. The collection process takes about 3 seconds (with a 500ms integration time). After the collection is completed, the instrument will display the collected spectral curve on the touchscreen.
3. Spectral Retrieval: The instrument will automatically perform spectral retrieval based on the built - in spectral library using the cosine similarity algorithm. The similarity value ranges from 0 to 1. When the similarity value is greater than the set threshold (default 0.92), the instrument will display the matched substance name and related information (such as physical and chemical properties) on the interface; if the similarity value is less than the threshold, it will display "No matching substances".
9.3 Result Saving and Reporting
1. Result Viewing: After the spectral retrieval is completed, click the "Result Details" button to view the detailed information of the detection result, including spectral curve, similarity value, substance name, detection time, and GPS location.
2. Report Generation and Saving: Click the "Generate Report" button to generate a PDF format test report. The report includes sample information, detection parameters, spectral graph, detection result, GPS information, and on - site photos (if the camera is used to take photos). Click the "Save Report" button to save the report to the instrument's internal storage or export it to a computer through the Type - C data cable.
3. Historical Record Query: Click the "Historical Records" icon on the main interface to view all previous detection records in the form of a list. Click a specific record to view the detailed report, delete the record, or upload the report to the cloud platform.
9.4 Post - Operation Shutdown and Maintenance
1. Instrument Shutdown: After the detection is completed, close all running programs on the instrument, press and hold the power button for 3 seconds until the shutdown prompt appears, and click "Confirm Shutdown" to turn off the instrument.
2. Cleaning and Maintenance: Use cleaning wipes to wipe the instrument surface and detection probe to remove dust and dirt. For the auxiliary detection heads and sample bottles, clean them with an appropriate solvent (such as alcohol) and dry them for later use. Do not use corrosive solvents for cleaning to avoid damaging the instrument or accessories.
3. Storage: Place the instrument and all accessories in the original packaging box or a dedicated storage box, and store them in a dry, cool, and well - ventilated environment, avoiding direct sunlight and high - temperature and high - humidity environments.
10. Sample Detection Steps
1. Sample Preparation:
◦ For solid samples (such as solid tablets, plastic products), ensure that the sample surface is clean and free of impurities. If the sample surface is contaminated, wipe it clean with a cleaning wipe.
◦ For powder samples (such as medicine powder, coal powder), take an appropriate amount of powder (≥0.5mL) and put it into a clean 2ml sample bottle. Tap the sample bottle gently to make the powder pile up and ensure that the powder thickness is sufficient to prevent the laser from passing through the powder.
◦ For liquid samples (such as ethanol, beverages), pour the liquid into a clean 2ml sample bottle, and the liquid volume should be sufficient to cover the detection area of the auxiliary detection cell (generally 1 - 2ml). Avoid bubbles in the liquid, as bubbles will affect the spectral collection results.
1. Pre - Detection Check:
◦ Turn on the instrument and log in to the system. Check whether the instrument's battery power is sufficient (if the power is less than 20%, charge the instrument first).
◦ Check the network connection status (if cloud retrieval is required). Ensure that the instrument is connected to a stable wireless network.
◦ Check the installation of the auxiliary detection head. Ensure that the auxiliary detection head is installed correctly and firmly, and there is no deviation or looseness.
1. Sample Detection:
◦ Solid Sample Detection: Install the solid/powder sample auxiliary detection head on the instrument's detection probe. Press the narrow end of the auxiliary detection head against the surface of the solid sample, ensuring that the probe is in close contact with the sample and there is no gap. Click the "Collect" button on the main interface to start spectral collection. After the collection is completed, view the retrieval result and generate a report.
◦ Powder Sample Detection: Put the powder sample into the sample bottle, install the solid/powder sample auxiliary detection head on the probe, and make the probe touch the top of the powder pile in the sample bottle. Click the "Collect" button to collect the spectrum, and then perform retrieval and result saving.
◦ Liquid Sample Detection: Install the liquid sample auxiliary detection cell on the detection probe. Put the liquid sample into the sample bottle, align the probe with the liquid in the sample bottle, and ensure that the detection area of the auxiliary detection cell is immersed in the liquid. Click the "Collect" button to collect the spectrum, and then complete the retrieval and report generation.
1. Result Verification and Processing:
◦ If the detection result shows a matched substance, compare the physical and chemical properties of the matched substance with the actual sample to verify the accuracy of the result. If there is any doubt about the result, repeat the detection 2 - 3 times or use a standard sample for calibration.
◦ If the detection result shows "No matching substances", check whether the laser intensity is set too low (adjust to 80), whether the detection threshold is too high (adjust to 0.92), and whether the retrieval range is correctly selected. If the problem persists, it may be that the substance is not in the built - in spectral library, and the user can add the spectral data of the substance to the user - built library for subsequent detection.
1. Post - Detection Cleaning and Storage:
◦ After the detection of each sample, clean the auxiliary detection head and sample bottle. For the solid/powder auxiliary detection head, wipe it with a cleaning wipe; for the liquid sample auxiliary detection cell and sample bottle, rinse them with distilled water and dry them.
◦ Turn off the instrument, store the instrument and accessories in a dedicated storage box, and charge the battery in time to ensure that the instrument is in a good state for the next use.
Article address:https://www.spectrometer.top/news/50.html